Reporters
Rstest 中的报告器控制测试结果的显示和处理方式。
你可以使用内置报告器获得不同的输出格式,或创建自定义报告器来集成到你的工作流程中。
配置方式
你可以通过以下方式配置报告器:
- CLI:
--reporters=<name> (可多次使用;同时兼容 --reporter 作为别名)
- 配置文件: 在
rstest.config.ts 中添加 reporters
import { defineConfig } from '@rstest/core';
import { customReporter } from './path/to/custom-reporter';

export default defineConfig({
  reporters: [
    'default', // 简单字符串报告器
    ['junit', { outputPath: './test-results.xml' }], // 带选项的报告器
    customReporter, // 自定义报告器实例
  ],
});
更多配置方式请参考 报告器配置。
内置报告器的 options 类型定义在 TypeScript types 中:packages/core/src/types/reporter.ts
内置报告器
Rstest 提供了多种内置报告器:
默认报告器
默认报告器在终端中显示测试运行状态、结果和汇总信息,带有彩色输出。
输出示例:
 ✓ test/index.test.ts (2)

 Test Files 1 passed
      Tests 2 passed
   Duration 112ms (build 19ms, tests 93ms)
配置选项:
summary:是否显示汇总信息(默认:true)logger:用于输出的自定义日志函数(默认:process.stdout/process.stderr)
进度报告
默认报告器在测试执行期间提供进度反馈,并根据你的环境自动调整。
TTY 环境(交互式终端)
在交互式终端中,默认报告器会在终端底部显示实时测试进度,包括当前正在运行的测试文件,以及运行超过 2 秒的测试用例。
 RUNS  src/database.test.ts
   > should handle concurrent writes 5s

 Test Files 12 passed | 1 running
      Tests 45 passed
   Duration 30s
此实时状态每秒更新一次,测试完成后会自动清除。
非 TTY 环境(CI、管道输出、AI agents)
在非 TTY 环境中,默认报告器会在控制台 30 秒无输出时自动输出一次进度日志。这可以防止 CI "无输出" 超时(例如,GitHub Actions 在 10 分钟无输出后会终止进程),同时不会干扰正常的测试结果输出。
[PROGRESS] test files: 20 done, 4 running | tests: 380 passed, 3 failed | 2m 30s
            Running: src/heavy.test.ts > database > concurrent writes 45s
            Running: src/other.test.ts
当某个测试用例运行超过 10 秒时,会显示其名称和耗时。这有助于识别卡住或慢速的测试。进度报告在输出 20 次后(约 10 分钟空闲时间)会自动停止,以避免在测试真正卡死时阻止 CI 超时机制生效。
详细报告器
详细报告器继承自默认报告器,为所有测试用例输出详细信息,包括成功的测试用例。进度报告等默认报告器的功能同样适用。当你需要对测试执行有完整可见性时使用此报告器。
npx rstest --reporters=verbose
import { defineConfig } from '@rstest/core';

export default defineConfig({
  reporters: 'verbose'
});
输出示例:
 ✓ test/index.test.ts (2) 2ms
  ✓ Index > should add two numbers correctly (1ms)
  ✓ Index > should test source code correctly (1ms)

 Test Files 1 passed
      Tests 2 passed
   Duration 112ms (build 19ms, tests 93ms)
Dot 报告器
Dot 报告器会为每个测试用例输出一个紧凑字符:
· 表示通过x 表示失败- 表示跳过* 表示 todo
npx rstest --reporters=dot
import { defineConfig } from '@rstest/core';

export default defineConfig({
  reporters: 'dot'
});
在标记行之后,它仍然会输出常规的失败摘要和耗时汇总。
GitHub Actions 报告器
GitHub Actions 报告器将在测试失败时以 GitHub Actions 工作流命令 的形式输出错误信息。
npx rstest --reporters=github-actions
import { defineConfig } from '@rstest/core';

export default defineConfig({
  reporters: ['github-actions']
});
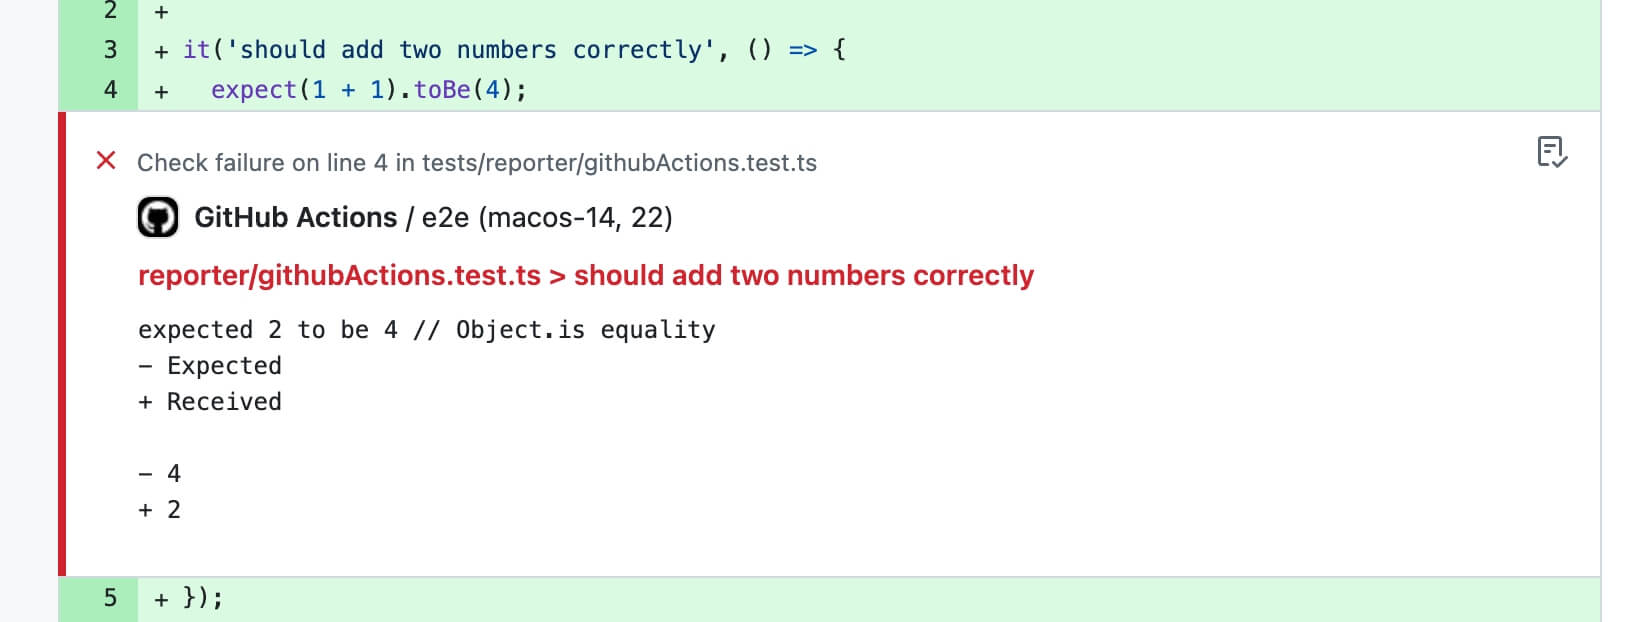
当测试失败时,GitHub Actions 报告器会输出类似以下格式的信息:
::error file=src/index.ts,line=4,col=17,title=test/index.test.ts > should add two numbers correctly::expected 2 to be 4
这些输出会被 GitHub Actions 解析并在对应位置生成注释。
当存在 GITHUB_STEP_SUMMARY(GitHub Actions 会自动注入)时,Rstest 还会追加一份 Markdown 摘要,包含:
- 测试汇总表(files/tests/duration)
- flaky tests 区块:展示重试后通过的用例,并在可用时附带之前失败信息的简短摘要
- 失败用例详情(错误信息、diff、错误堆栈)
- 每个失败用例的复现命令
- 带状态标记的标题(
✅ / ❌)
- 每次 test run 独立的可折叠区块;成功时默认折叠
自动启用
当没有手动设置报告器时,Rstest 在检测到 GitHub Actions 环境(process.env.GITHUB_ACTIONS 为 'true')时会自动启用此报告器。
手动启用
你也可以手动启用此报告器:
npx rstest --reporters=github-actions
import { defineConfig } from '@rstest/core';

export default defineConfig({
  reporters: ['github-actions']
});
选项
import { defineConfig } from '@rstest/core';

export default defineConfig({
  reporters: [['github-actions', { annotations: true, summary: false }]],
});
JUnit 报告器
生成 JUnit XML 格式的测试报告,非常适合 CI/CD 集成和测试结果聚合。
npx rstest --reporters=junit
import { defineConfig } from '@rstest/core';

export default defineConfig({
  reporters: [['junit', { outputPath: './junit.xml' }]]
});
配置选项:
outputPath:输出文件路径 (默认为控制台输出)
JUnit 报告器生成如下 XML 格式:
<?xml version="1.0" encoding="UTF-8"?>
<testsuites name="rstest tests" tests="3" failures="1" errors="1" skipped="1" time="0.3" timestamp="2024-01-01T00:00:00.000Z">
  <testsuite name="test1.test.ts" tests="3" failures="1" errors="1" skipped="1" time="0.3" timestamp="2024-01-01T00:00:00.000Z">
    <testcase name="should pass" classname="test1.test.ts" time="0.1">
    </testcase>
    <testcase name="should fail" classname="test1.test.ts" time="0.2">
      <failure message="Test failed" type="AssertionError">expected 'hi' to be 'hii' // Object.is equality - Expected + Received - hii + hi at test1.test.ts:10:21</failure>
    </testcase>
    <testcase name="should skip" classname="test1.test.ts" time="0.0">
      <skipped/>
    </testcase>
  </testsuite>
</testsuites>
JUnit 报告器将测试用例执行状态映射到 JUnit 测试状态:
pass:测试通过fail:测试失败,生成 <failure> 标签skip:测试跳过,生成 <skipped> 标签todo:测试待办,生成 <skipped> 标签
JSON 报告器
生成稳定的 JSON 文档,适合 CI 工具、自定义 dashboard 或后处理脚本直接消费。
npx rstest --reporters=json
import { defineConfig } from '@rstest/core';

export default defineConfig({
  reporters: [['json', { outputPath: './reports/rstest.json' }]],
});
配置选项:
outputPath:输出文件路径(默认输出到 stdout)
输出结构:
status:本次运行的整体状态(pass 或 fail)summary:文件和测试的聚合计数durationMs:总耗时、构建耗时和测试耗时(毫秒)snapshot:本次运行的 snapshot 汇总files:按测试文件聚合的结果,包含嵌套测试项tests:扁平化测试结果,每项都带 fullNameconsoleLogs:捕获到的用户 console 输出(如果有)unhandledErrors:顶层 unhandled errors(如果有)
JSON 报告器会将 testPath 写成相对路径,这样在不同机器和 CI workspace 中输出更稳定。
Markdown 报告器
Markdown 报告器会将结果以一份完整的 markdown 文档输出到 stdout,主要用于 agent / LLM 场景。
在 agent 环境中,只有当你没有显式配置 reporters 时,Rstest 才会默认使用 md。
默认 preset 为 normal,主要针对 agent 工作流做了取舍:
- 每个失败用例都会输出 repro 命令(
file+name),方便 agent 精准复跑某一个失败 case。
- stack 默认使用
top(稳定的定位锚点),而不是输出完整的 stack frames。
- console 默认开启,但带有严格的输出上限,避免报告体积失控。
- 当失败数量超过
failures.max 时,会先输出包含最小字段的完整失败列表(repro / type / message / expected / actual),并且只展开前 failures.max 个失败的完整详情。
几个 preset 的主要区别,在于失败信息默认会保留多少上下文:
这些 preset 不会改变 markdown 的整体结构,主要影响的是失败部分默认展开的上下文多少。
npx rstest --reporters=md
import { defineConfig } from '@rstest/core';

export default defineConfig({
  reporters: ['md'],
});
默认输出总是先给出报告标题,然后是摘要;在需要时列出测试项,最后给出失败信息。
当所有测试都通过时,输出摘录大致如下:
## Summary

```json
{
  "status": "pass",
  "counts": {
    "testFiles": 2,
    "failedFiles": 0,
    "tests": 14,
    "failedTests": 0,
    "passedTests": 13,
    "skippedTests": 1,
    "todoTests": 0
  }
}
```

## Failures

No test failures reported.

Note: all tests passed. Lists omitted for brevity.
当存在失败时,输出摘录大致如下:
## Summary

```json
{
  "status": "fail",
  "counts": {
    "testFiles": 1,
    "failedFiles": 1,
    "tests": 1,
    "failedTests": 1,
    "passedTests": 0,
    "skippedTests": 0,
    "todoTests": 0
  }
}
```

## Failures

### [F01] fixtures/agent-md/index.test.ts :: agent-md > fails with diff

details:

```json
{
  "testPath": "fixtures/agent-md/index.test.ts",
  "fullName": "agent-md > fails with diff",
  "status": "fail"
}
```

diff:

```diff
- Expected
+ Received

- 3
+ 2
```
如果你希望在 CI 日志或多轮 agent 工作流里进一步压缩输出,可以切到 compact preset,并收紧失败详情数量:
rstest.config.ts
import { defineConfig } from '@rstest/core';

export default defineConfig({
  reporters: [
    [
      'md',
      {
        preset: 'compact',
        failures: { max: 20 },
        reproduction: 'file+name',
      },
    ],
  ],
});
Blob 报告器
Blob 报告器将测试结果序列化为 JSON 文件,以便后续合并。它专门用于 CI 环境中的测试分片场景,在多台机器上拆分运行测试后需要合并结果。
npx rstest run --shard 1/3 --reporters=blob
import { defineConfig } from '@rstest/core';

export default defineConfig({
  reporters: ['blob'],
});
配置选项:
outputDir:blob 报告文件的存储目录(默认:.rstest-reports)
rstest.config.ts
import { defineConfig } from '@rstest/core';

export default defineConfig({
  reporters: [['blob', { outputDir: './custom-blob-output' }]],
});
Blob 文件默认保存到 .rstest-reports/ 目录。所有分片完成后,使用 rstest merge-reports 将它们合并为统一的报告。
完整的 CI 工作流示例请参考使用分片拆分测试。
自定义报告器
对于高级集成需求,你可以通过实现 Reporter 接口来创建自定义报告器。
更多详细信息可以在 Reporter API 参考 中找到。